Step 1
First of all open up a new document and fill it in with black. Then add your text using a font you like and the color #00e5ff.

Step 2
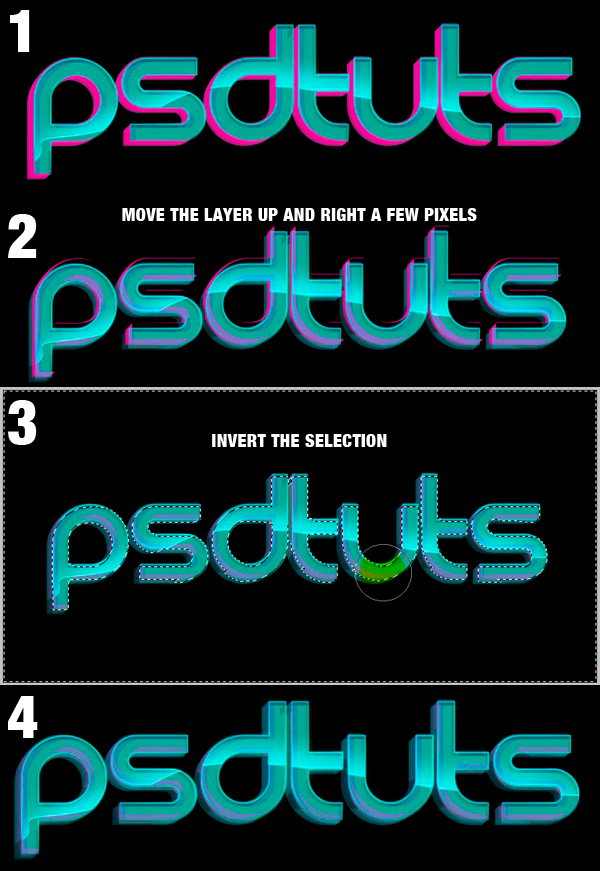
Next duplicate the layer by pressing (Command + J), set the layer Opacity to 65% and move it down and left 1 px each.

Step 3
Next duplicate the text layer in Step 2 four more times. Then move each 1 px down and left as you did before.

Step 4
Next you need to select all the layers except for the background and the first text you created. Now right-click and chose Rasterize Type, then Merge the layers and set the new layer to 47% Opacity.

Step 5
Use the Polygonal Lasso Tool (L) and make a selection, as shown below. Next, use the Smudge Tool (R) set to a Master Diameter of 19 px, Hardness of 100%, Strength of 30%, and smudge the right part of the layer so you can cover up that empty part.

Step 6
Repeat the same process with the other letters.

Step 7
For the lower part of the “S” letter, make a selection as shown, but this time simply erase the unwanted part of the letter by pressing Backspace.

Step 8
Erase the upper part of the letters: “d,” “t,” “u,” and “t,” then erase the lower part of the “s.”

Step 9
Next use the Smudge Tool (R) as you did in Step 5. Use the Smudge Tool for the letters “t,” “t” and “s.”

Step 10
Next move the original text layer above the duplicate. Also, set the Opacity of the duplicated layer to 35%. Select the original text layer and double-click on it to enter the Blending Options and then add a stroke.

Step 11
Next select the text layer below and duplicate it. Use the Pen Tool (P) and create a stroke like below and transform it into a selection. Now simply erase over the selection using the Eraser Tool (E) set to 24% Opacity.

Step 12
Next create a new layer above the duplicated text layers. In this layer add some color to the text. To do this you first need to make a selection of the entire text by holding down the Command key and pressing once on the duplicated text layer thumbnail. Now fill the selection with #ff009c. Don’t mind the blue clouds behind the text.

Step 13
Set the layer to Hue and Opacity to 35%.

Step 14
Make a selection of the first text layer and then go into each of the below layers and press backspace to clear the selected areas. As you can see below, the text effect will still be visible, but we need to erase some areas for future adjustments.

Step 15
Create a new layer below the “pink” layer and make a selection as shown below, then fill the selection with white. Also, set the layer to 38% Opacity and the original “text” layer to 68% Opacity.

Step 16
Make a selection of the original “text” layer. Now use a soft brush for the Eraser Tool (E) to clear the corners of the white layer that don’t look good.

Step 17
Make another selection of the original text layer and create a new layer above it. Then select the Lasso Tool (L) and right-click on the screen and choose stroke. Set the stroke to 2 px and color to #00fcff.

Step 18
Duplicate the stroke from Step 17 and move it like below. Now make a selection as shown, and use the Eraser Tool (E) set to 40% Opacity to erase the stroke that is inside the selection. In the end, set the layer to 10% Opacity.

Step 19
Make another selection on the original text and then subtract like below. Create a new layer above the original “text” layer, and apply the same color as you used for the stroke add a simple gradient. Then add another stroke using #c2feff.

Step 20
Duplicate the “white text” layer and brush over it with the color #f1ff12. Then set the layer Opacity to 23% and move it as shown.

Step 21
Make a selection like below by Command-clicking on the original text thumbnail and inverse the selection. Then using the Eraser Tool (E) you need to erase the edges like in Step 16.

Step 22
Now it is time to get back to the “pink” layer. Activate it and set the Opacity back to 100%. Make a selection like below, invert it and erase the excess using the Eraser Tool (E).
Step 23
Move the “pink” layer you just created above the original text layer and set it to Overlay.

Conclusion
You are finished with the text effect but to make this a bit more interesting I will create another element and that is the plus using the same techniques. Also, add the final element, which is an interesting background that I purchased from Graphic River. You can view the final image below or view a larger version here.

Tidak ada komentar:
Posting Komentar